Infrastructure as Code: Crafting Serverless Web Apps on AWS


TLDR: show me the code
These days, a lot of web developers are using Amazon Web Services (AWS). In this blog post, I'll show you how to set up a serverless web app on AWS, step-by-step. We'll be using some simple web technologies for this task and aws-cdk for IaS (Infrastructure as Code).
Here is our plan
- We'll create a frontend using React, a popular tool for building user interfaces.
- Then, we'll create a backend using Express.js.
- After that, we'll pack up our app into containers using Docker, to keep our app running and bundling the same way in every environment.
- Lastly, we'll deploy our web app to AWS using AWS CDK, a tool that makes deploying applications on AWS a breeze.
By the end of this guide, you will understand how to set up serverless web app on AWS using Infrastructure as Code tooling.
Setting Up Frontend Project
For this demonstration, I've chosen to utilize React in combination with TypeScript and Webpack, offering a strong foundation for building robust frontend applications. While our web application only serves a static page for demonstration purposes, the crucial part lies in the project setup to ensure its compatibility across different environments - local, Docker container, and the cloud.
const createDevelopmentConfig = (config) => {
  return {
    entry: "./src/index.tsx",
    mode: "development",
    output: {
      filename: "bundle.js",
      path: path.resolve(__dirname, "build"),
      clean: true,
    },
    resolve: {
      extensions: [".tsx", ".ts", ".js", ".jsx"],
    },
    devServer: {
      port: config.devServerPort,
    },
    module: {
      rules: [
        {
          test: /\.tsx?$/,
          use: "ts-loader",
          exclude: /node_modules/,
          options: {
            transpileOnly: true,
          },
        },
      ],
    },
    plugins: [
      new HtmlWebpackPlugin({
        template: path.join(__dirname, "public", "index.html"),
      }),
    ],
    optimization: {
      removeAvailableModules: false,
      removeEmptyChunks: false,
      splitChunks: false,
    },
  };
};The Webpack file is configured to use ts-loader to process TypeScript files and to set an entry point for our HTML template page. Interestingly, we also have a setup that disables all TypeScript validation and Webpack optimizations. This configuration is designed to expedite the bundling process during project development. Thus, we achieve faster iteration cycles and enhanced productivity.
const createProductionConfig = () => {
  return {
    entry: "./src/index.tsx",
    mode: "production",
    output: {
      filename: "bundle.js",
      path: path.resolve(__dirname, "build"),
      clean: true,
    },
    resolve: {
      extensions: [".tsx", ".ts", ".js", ".jsx"],
    },
    module: {
      rules: [
        {
          test: /\.tsx?$/,
          use: "ts-loader",
          exclude: /node_modules/,
        },
      ],
    },
    plugins: [
      new HtmlWebpackPlugin({
        template: path.join(__dirname, "public", "index.html"),
      }),
    ],
  };
};
Production configuration is very similar to development configuration, except all optimizations are enabled and no dev server is running.
Setting Up Backend Project
In the frontend project, we used Webpack as one of the available technologies to illustrate the project setup. However, when it comes to the backend, the use of Webpack is less discretionary and more strategic. By bundling all packages into a single file and performing tree shaking, Webpack reduces the bundle size, which is a crucial factor in AWS Lambda functions cold start.
However, bundling the project into a single file does come with a significant caveat - it disallows the use of dynamic imports. For instance, dynamic imports like const module = require(variable) can produce runtime errors. Instead, you must resort to hardcoded imports like const module = require('./some-module').
Similar to the frontend, we want our code to run in three places - local development, Docker, and AWS Lambda. To ensure this, we create two entry points into the application - one for Lambda and another for local development and Docker.
import { configure } from "@vendia/serverless-express";
import { createApp } from "./app";

const app = createApp();

export const handler = configure({ app });
For the Lambda entrypoint, it is necessary to create a JavaScript file that exports a function. The function must be accessible via const handler = require('./bundle').
At runtime, instead of having an open port to listen for incoming connections, our bundle is invoked with an event. This is where the @vendia/serverless-express package becomes invaluable. It maps Lambda events to an HTTP connection with all relevant data, and it integrates seamlessly with Express.js.
const createProductionConfig = () => {
  return {
    entry: "./src/lambda.ts",
    target: "node",
    resolve: {
      extensions: [".ts", ".mjs", ".js"],
    },
    output: {
      filename: "bundle.js",
      libraryTarget: "commonjs", // allows module.exports for the bundle
      path: path.resolve(__dirname, "build"),
    },
    module: {
      rules: [
        {
          test: /\.ts$/,
          use: {
            loader: "ts-loader",
          },
          exclude: /node_modules/,
        },
      ],
    },
  };
};When using Webpack to bundle everything together, it builds an internal hashmap to reference modules, which changes the code's structure. By default, Webpack won't export any modules externally. To have our handler exported, we need to modify the libraryTarget to "commonjs". This configuration ensures that all the modules exported from the original source files are indeed exported.
Setting Up the Docker and Docker Compose
Running our project in Docker requires a couple of things: a Dockerfile and a docker-compose.yaml file. The Dockerfile helps us set up the environment for our project. We'll use it to set up Node.js, add packages, copy our project files into the Docker container, and finally, build the project.
For AWS, we'll build everything inside the Docker container. But for working on our project locally, we want to setup docker-compose.yaml. It will connect our project directory to the Docker container and run it from there.
FROM node:18 as builder # naming the target
WORKDIR /backend

RUN npm i -g pnpm # installing pnpm

COPY package.json pnpm-lock.yaml ./ # copy dependency files

RUN pnpm i # installing the dependencies
COPY . ./ # copy the whole project
RUN npm run build # building the project


FROM node:18 as runner # naming the target
# Behind the scenes inside docker-compose we are going to mount the project directory

WORKDIR /backend

ENTRYPOINT [ "npm", "start" ] # starting the project
EXPOSE 3000 # exposing port from the dockerIn our backend Dockerfile, we've set up two targets - "builder" and "runner". The "builder" will be used for the deploying code, while the "runner" is for local development alongside docker-compose.yaml.
version: "3.9"
services:
  backend:
    container_name: backend
    volumes:
      - ./backend:/backend
    build:
      context: "backend/"
      dockerfile: Dockerfile
      target: runner
    ports:
      - 3000:3000
  frontend:
    container_name: frontend
    volumes:
      - ./frontend:/frontend
    build:
      context: "frontend/"
      dockerfile: Dockerfile
      target: runner
    ports:
- 4000:4000Docker Compose plays an important role in this setup, allowing us to configure multiple containers to run together, define their targets, networking, mount points, and so forth.
For local development, we're running two Docker containers - backend and frontend. We define the directories we want to mount, the targets to build and run, and the ports to map to the local machine. Initiating our mini-cluster is as simple as running the command docker-compose up (on Linux) and we're up and running!
Setting up Domain Name and Route53 Public Zone
Skip this step if you have purchased domain on Route53.
To run demo project, you'll need a domain name. It doesn't matter where you have purchased it, as long as you can update its records. Later we will be utilizing Route53 (AWS DNS service) to route our users to our services and validate our ssl certificates.
To set up Route53 public zone, you'll need to create one via the AWS console. Here's how you can do it:
- Navigate to the AWS console.
- Click on Route53.
- Go to "Hosted Zones".
- Click on "Create Hosted Zone".
For instance, if you've created a public zone named "xx.yy.com" and you own a domain "yy.com", you'll need to create an NS (Name Server) record inside "yy.com"'s record set. You can do this by logging into your DNS provider's platform (like GoDaddy.com) and set the record.
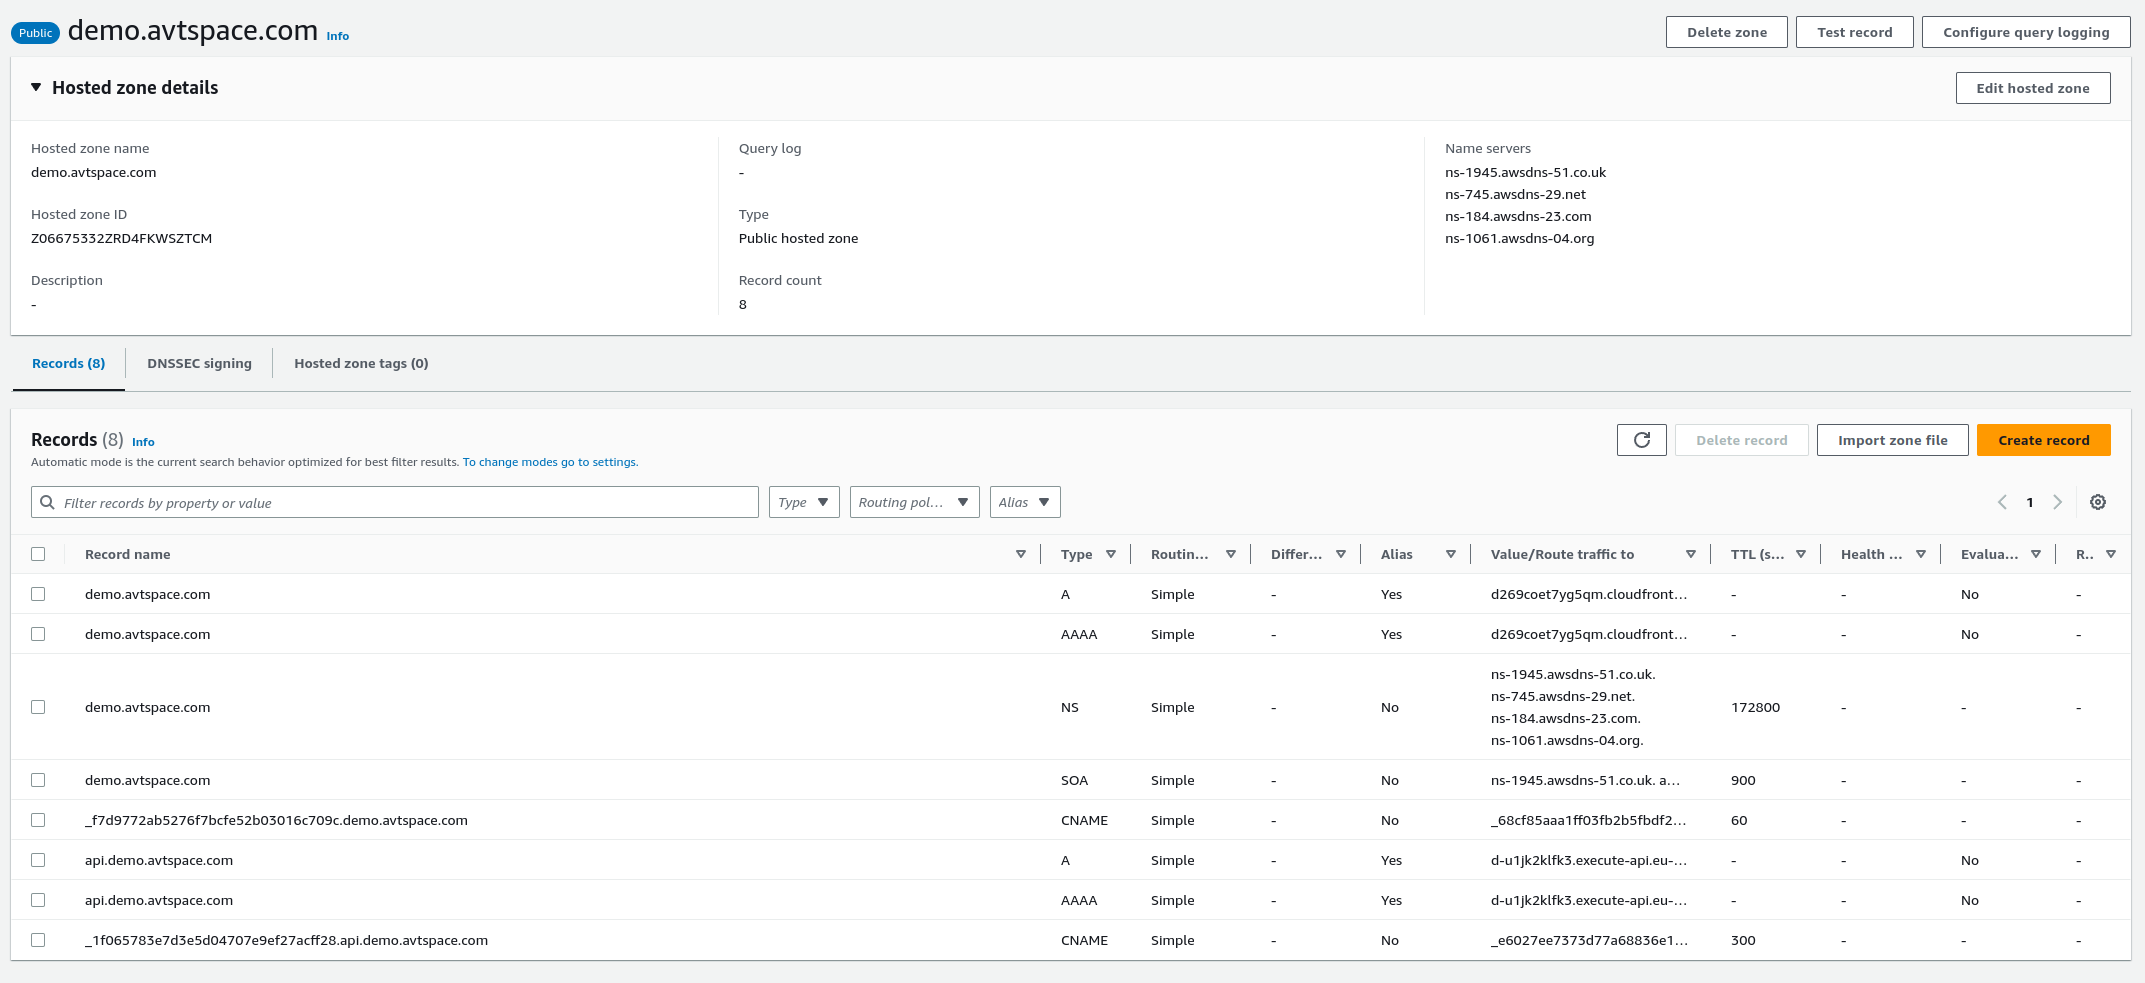

The key of the record must be subdomain and value of the record must be set to the public zone's name servers, which you can find in the details of the newly created public zone.
After setting up the public zone and adding the records in the parent DNS records, you'll gain "ownership" of this subdomain until the records are removed from the parent.
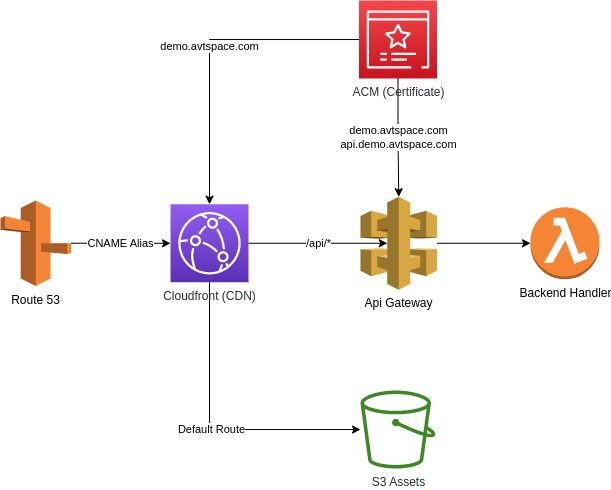
Infrastructure
In this section, we'll dive into the deployment process of our web application. For our infrastructure, we'll leverage AWS CDK, a powerful tool that lets us define cloud infrastructure in code. Our setup will involve integrating multiple AWS services, the Dockerfile setup we discussed earlier, and naturally, our frontend and backend code.
Here's a breakdown of the AWS services we'll be using:
- Route53: This service, which we set up earlier with a public zone, will be used for managing DNS records and validating certificates.
- Cloudfront: This service will act as the CDN (Content Delivery Network) for our app and allowing us to host both our backend and frontend under a single endpoint.
- S3 Bucket: This AWS service will be used to serve our frontend assets.
- API Gateway: This service will work as a proxy, integrating Cloudfront with Lambda.
- ACM (AWS Certificate Manager): We'll use this service to issue SSL certificates to secure our app.
- Lambda: We'll use this for running our backend applications.
Infrastructure for Backend App
Setting up the backend of our web application involves building and bundling the application within Docker, and then transferring the build artifacts to AWS Lambda (actually to S3 bucket, but AWS-CDK hides that from us). One of the advantages of this approach is that we don't need to concern ourselves with the details of how the backend app is built. All we need to know is the Docker target stage, the location of the assets inside the container, and the location of the Docker context.
    const code = cdk.aws_lambda.Code.fromDockerBuild("../backend/", {
      targetStage: "builder",
      imagePath: "/backend/build",
      platform: "linux/amd64",
    });

    const func = new cdk.aws_lambda.Function(this, "Handler", {
      runtime: cdk.aws_lambda.Runtime.NODEJS_18_X,
      handler: "bundle.handler",
      code: code,
      memorySize: 2048,
});In the second phase, we'll establish our API Gateway, create a certificate for it, and set up DNS records to route users to our gateway. AWS will automatically validate these certificates by inserting validation records in the Route53 Public Zone. Note that we provide two domain names, "xx.yy.com" and "api.xx.yy.com". The latter is used solely for debugging, enabling us to check if the API Gateway is operating correctly independent of Cloudfront.
    const certificate = new cdk.aws_certificatemanager.Certificate(
      this,
      "Certificate",
      {
        domainName: props.apiDomainName,
        validation: cdk.aws_certificatemanager.CertificateValidation.fromDns(
          props.hostedZone
        ),
        subjectAlternativeNames: [props.cloudfrontDomainName],
      }
    );


    this.restApi = new cdk.aws_apigateway.LambdaRestApi(this, "RestApi", {
      handler: func,
      proxy: true,
      domainName: {
        certificate: certificate,
        domainName: props.apiDomainName,
      },
      endpointTypes: [cdk.aws_apigateway.EndpointType.REGIONAL],
    });

    new cdk.aws_route53.ARecord(this, "ApiAliasARecord", {
      target: cdk.aws_route53.RecordTarget.fromAlias(
        new cdk.aws_route53_targets.ApiGateway(this.restApi)
      ),
      zone: props.hostedZone,
      recordName: props.apiDomainName,
    });

    new cdk.aws_route53.AaaaRecord(this, "ApiAliasAAAARecord", {
      target: cdk.aws_route53.RecordTarget.fromAlias(
        new cdk.aws_route53_targets.ApiGateway(this.restApi)
      ),
      zone: props.hostedZone,
      recordName: props.apiDomainName,
});Infrastructure for Frontend App
The infrastructure setup for the frontend app is relatively straightforward. Similar to the backend, we build our assets within a Docker image and then upload them to an Amazon S3 bucket with the help of AWS CDK.
An interesting aspect to note is the difference in bundling between the frontend and backend apps. For the backend, cdk.aws_lambda.Code.fromDockerBuild uses Docker's CP command-line interface to extract assets from the Docker image. On the other hand, for the frontend, cdk.aws_s3_deployment.Source.asset uses a mounted directory and a command that places assets inside this directory.
    this.frontendAppBucket = new cdk.aws_s3.Bucket(this, "Bucket");

    const bundle = cdk.aws_s3_deployment.Source.asset("../frontend", {
      bundling: {
        image: cdk.DockerImage.fromBuild("../frontend/", {
          targetStage: "builder",
          platform: "linux/amd64",
        }),
        command: ["bash", "-c", "cp -r /frontend/build/* /asset-output/"],
      },
    });

    new cdk.aws_s3_deployment.BucketDeployment(this, "DeployWebsite", {
      sources: [bundle],
      destinationBucket: this.frontendAppBucket,
});This setup enables you to build and deploy your frontend application successfully on AWS, integrating seamlessly with your Docker and S3 configurations.
Infrastructure for Cloudfront Distribution (CDN)
We have the frontend app in an S3 bucket and the API Gateway with our backend app bundle inside a lambda function. Now, we need to put both the frontend and backend behind a Content Delivery Network (CDN).
AWS Cloudfront is a feature-rich CDN that we'll use for this purpose. One essential detail to note is that certificates for AWS Cloudfront must be located in the us-east-1 region. because Cloudfront is a global service, whereas ACM (AWS Certificate Manager) is not. We can specify the certificate region to us-east-1 as shown below:
    const certificate = new cdk.aws_certificatemanager.DnsValidatedCertificate(
      this,
      "Certificate",
      {
        domainName: props.cloudfrontDomainName,
        hostedZone: props.hostedZone,
        region: "us-east-1",
        validation: cdk.aws_certificatemanager.CertificateValidation.fromDns(
          props.hostedZone
        ),
      }
    );
Next, we'll create two behaviors in Cloudfront. One will integrate with our API Gateway, and the second one will integrate with the S3 bucket to serve assets.
    const distribution = new cdk.aws_cloudfront.Distribution(
      this,
      "Distribution",
      {
        domainNames: [props.cloudfrontDomainName],
        certificate: certificate,
        defaultRootObject: "index.html",
        errorResponses: [
          {
            httpStatus: 403,
            responsePagePath: "/index.html",
            responseHttpStatus: 500,
          },
        ],
        defaultBehavior: {
          origin: new cdk.aws_cloudfront_origins.S3Origin(
            props.frontendApp.frontendAppBucket
          ),
        },
        additionalBehaviors: {
          "/api/*": {
            origin: new cdk.aws_cloudfront_origins.HttpOrigin(
              props.backendApp.restApi.domainName!.domainName
            ),
            allowedMethods: cdk.aws_cloudfront.AllowedMethods.ALLOW_ALL,
            cachePolicy: cdk.aws_cloudfront.CachePolicy.CACHING_DISABLED,
            originRequestPolicy:
              cdk.aws_cloudfront.OriginRequestPolicy
                .ALL_VIEWER_EXCEPT_HOST_HEADER,
          },
        },
      }
    );
The first behavior, /api/*, routes all requests to our API Gateway. It is important to set originRequestPolicy to exclude the Host header, otherwise, Cloudfront will forward the received host header from the client. However, the API Gateway expects its domain name as the Host header value, otherwise, it will return an error message.
The default behavior points to our S3 bucket. Since the entry point for most SPA (Single Page Applications) is usually "index.html", we set a fallback page to /index.html when the origin returns status code 403 (when the object in S3 is not found). To address user opening the root URL /, we set defaultRootObject to be "index.html".
Lastly, we populate our DNS records for our CDN, much like we did for our API Gateway:
    new cdk.aws_route53.ARecord(this, "ApiAliasARecord", {
      target: cdk.aws_route53.RecordTarget.fromAlias(
        new cdk.aws_route53_targets.CloudFrontTarget(distribution)
      ),
      zone: props.hostedZone,
      recordName: props.cloudfrontDomainName,
    });

    new cdk.aws_route53.AaaaRecord(this, "ApiAliasAAAARecord", {
      target: cdk.aws_route53.RecordTarget.fromAlias(
        new cdk.aws_route53_targets.CloudFrontTarget(distribution)
      ),
      zone: props.hostedZone,
      recordName: props.cloudfrontDomainName,
    });
This configuration sets up the necessary infrastructure to host your applications behind a CDN using Cloudfront.
Deploying the infrastructure
Having explored all the vital components of our project, we're now ready to take the final step - deploying our serverless web app on AWS. For this task, we'll turn to the Infrastructure directory and run npm run deploy -- --context zoneName=yy.com --context zoneId=xxx . Underneath the surface, this command executes the cdk deploy command.
Before deploying, you need to set up the AWS CLI with your desired AWS account. Ensure that this account aligns with the one where your public hosted zone is created. Additionally, you need to pass in your domain name and public zone ID as context parameters.
By successfully deploying your infrastructure, you're essentially bringing your serverless web application to life.
Final Thoughts
In retrospect, I believe that we've laid down a solid foundation for building serverless web applications using the AWS stack and looked into AWS-CDK IaC tooling. While we've made use of specific components for our project, remember that they are interchangeable depending on your requirements. For instance, Lambda and API Gateway could be replaced with ECS and a Load Balancer.
In terms of cost-efficiency, serverless architecture offers considerable benefits. Since there are no servers continuously running and assets are cached on a CDN, you primarily pay only for the duration your Lambda function is in operation.
Let's also not forget about the resilience and high-availability of our services. By default, AWS Lambda is not dependant on a specific AZ in the region. This means that if an Availability Zone encounters issues, Lambda will automatically spawn in different Availability Zone. Compared to running EC2, ECS, or EKS instances, our serverless solution is cost-effective while ensuring high availability. However, it's worth noting that with high constant traffic, a persistent backend could potentially be more economical.
I hope this guide serves as a valuable stepping stone in the future endeavours and builds some insights how to set up simple projects with aws.